Remediation with Monokle Cloud: Auto-fix
In the tutorial Fix your First Misconfigurations, we talked about how Monokle identifies the policy violations in your repository and suggests remediation to fix them. While some require specific changes based on your application, there are certain policy violations that can be auto-fixed or suppressed based on project requirements. Some of these policies are:
- Containers must drop ALL capabilities and are only permitted to add back those that are needed for execution like the NET_BIND_SERVICE capability.
- For containers, setting the SELinux type is restricted. Setting a custom SELinux user or role option is forbidden.
- Containers require a read-only root file system.
- Disallow containers to run with a low user ID and more.
Suppressing and auto-fixing policies require careful consideration before being auto-fixed or suppressed.
Let’s understand in detail how auto-fixing policy violations can be achieved using Monokle Cloud.
Auto Fix with Monokle Cloud
Fixing small repetitive errors can be time-consuming and requires a lot of manual changes to YAML. If not done carefully, this can lead to unwanted errors. Monokle realized this and came up with the auto-fix feature to automate this process.
For policies like those we talked about above, the solution is mostly a standard fix adhering to Kubernetes best practices. Monokle suggests fixes for such policy violations. You can directly apply those suggestions using the auto-fix icon beside the error. Monokle will update the corresponding Kubernetes configuration for you with suggested changes. Behind the scenes, Monokle makes use of OpenAI's libraries to achieve this fix.
Let’s get started with using the auto-fix feature to fix a Kubernetes misconfiguration in a repository.
Prerequisites
- Sign up or sign in to Monokle Cloud.
- Configure a repository.
Get Started With Monokle’s Auto Fix Feature
When you're fixing misconfigurations in your Kubernetes cluster, you'll find that many issues can be resolved by adding or removing specific properties. Monokle simplifies this task by providing suggestions to fix each error and then automatically implementing the accepted changes in your source code.
The following step-by-step guide will get you started with auto-fixing a misconfiguration using Monokle Cloud.
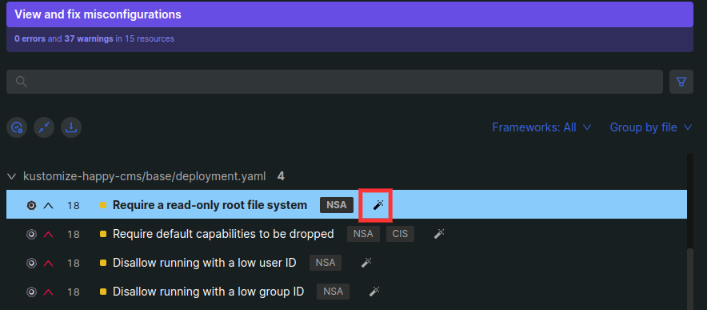
- Click on “View and fix misconfigurations” in the menu bar.
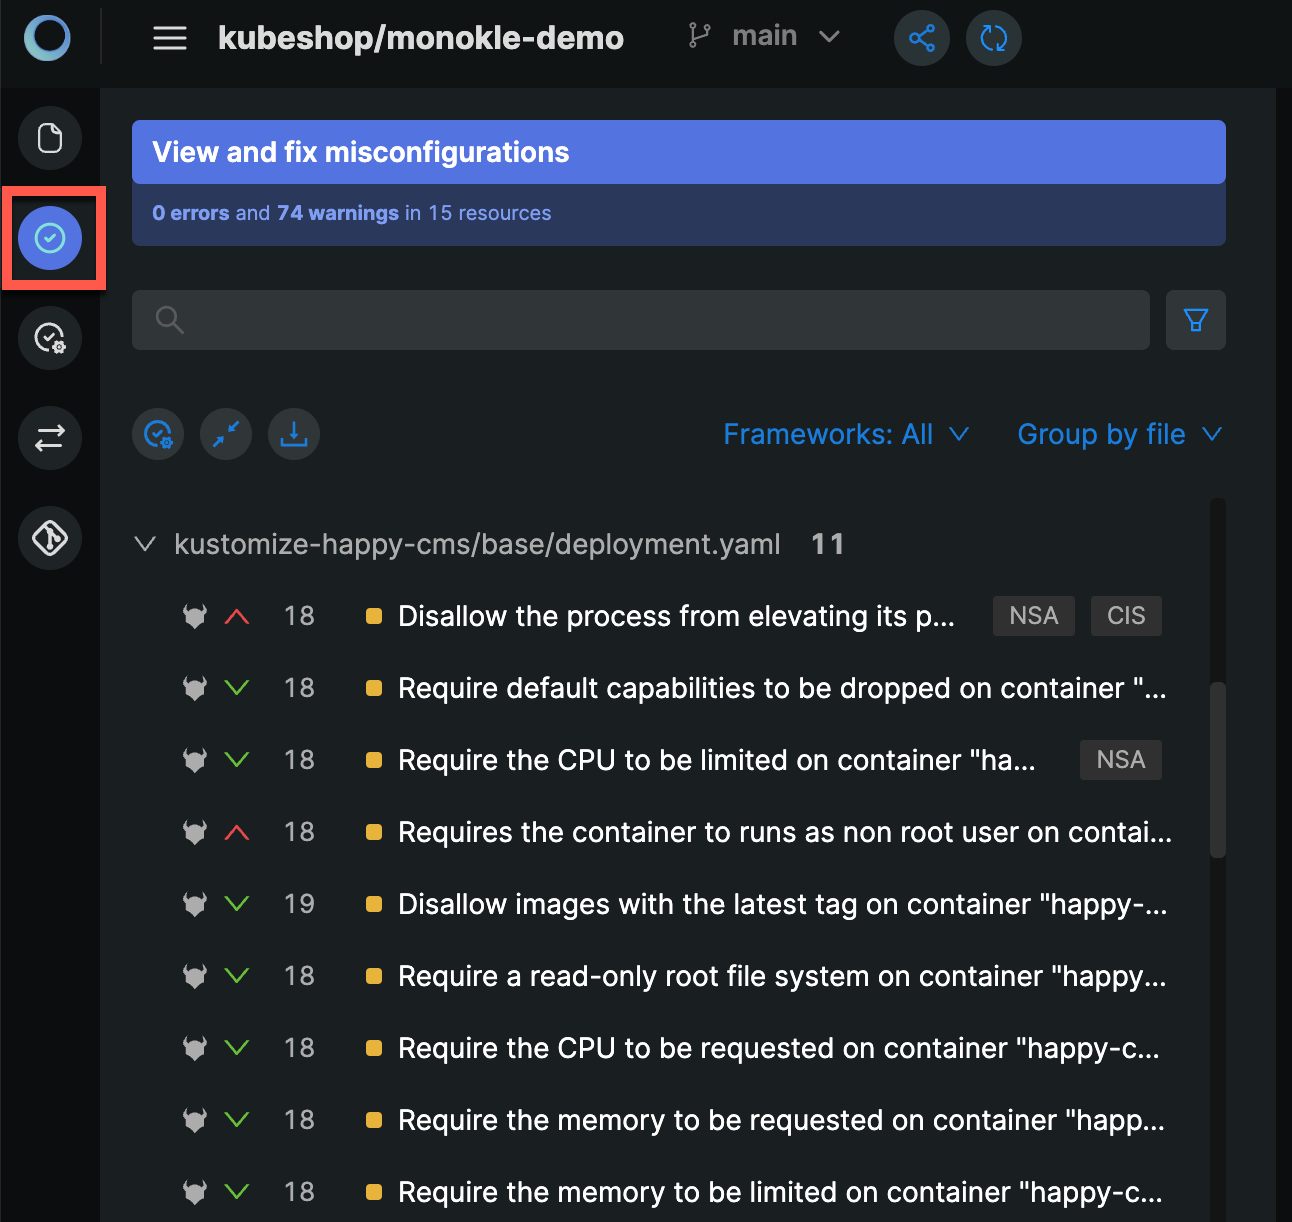
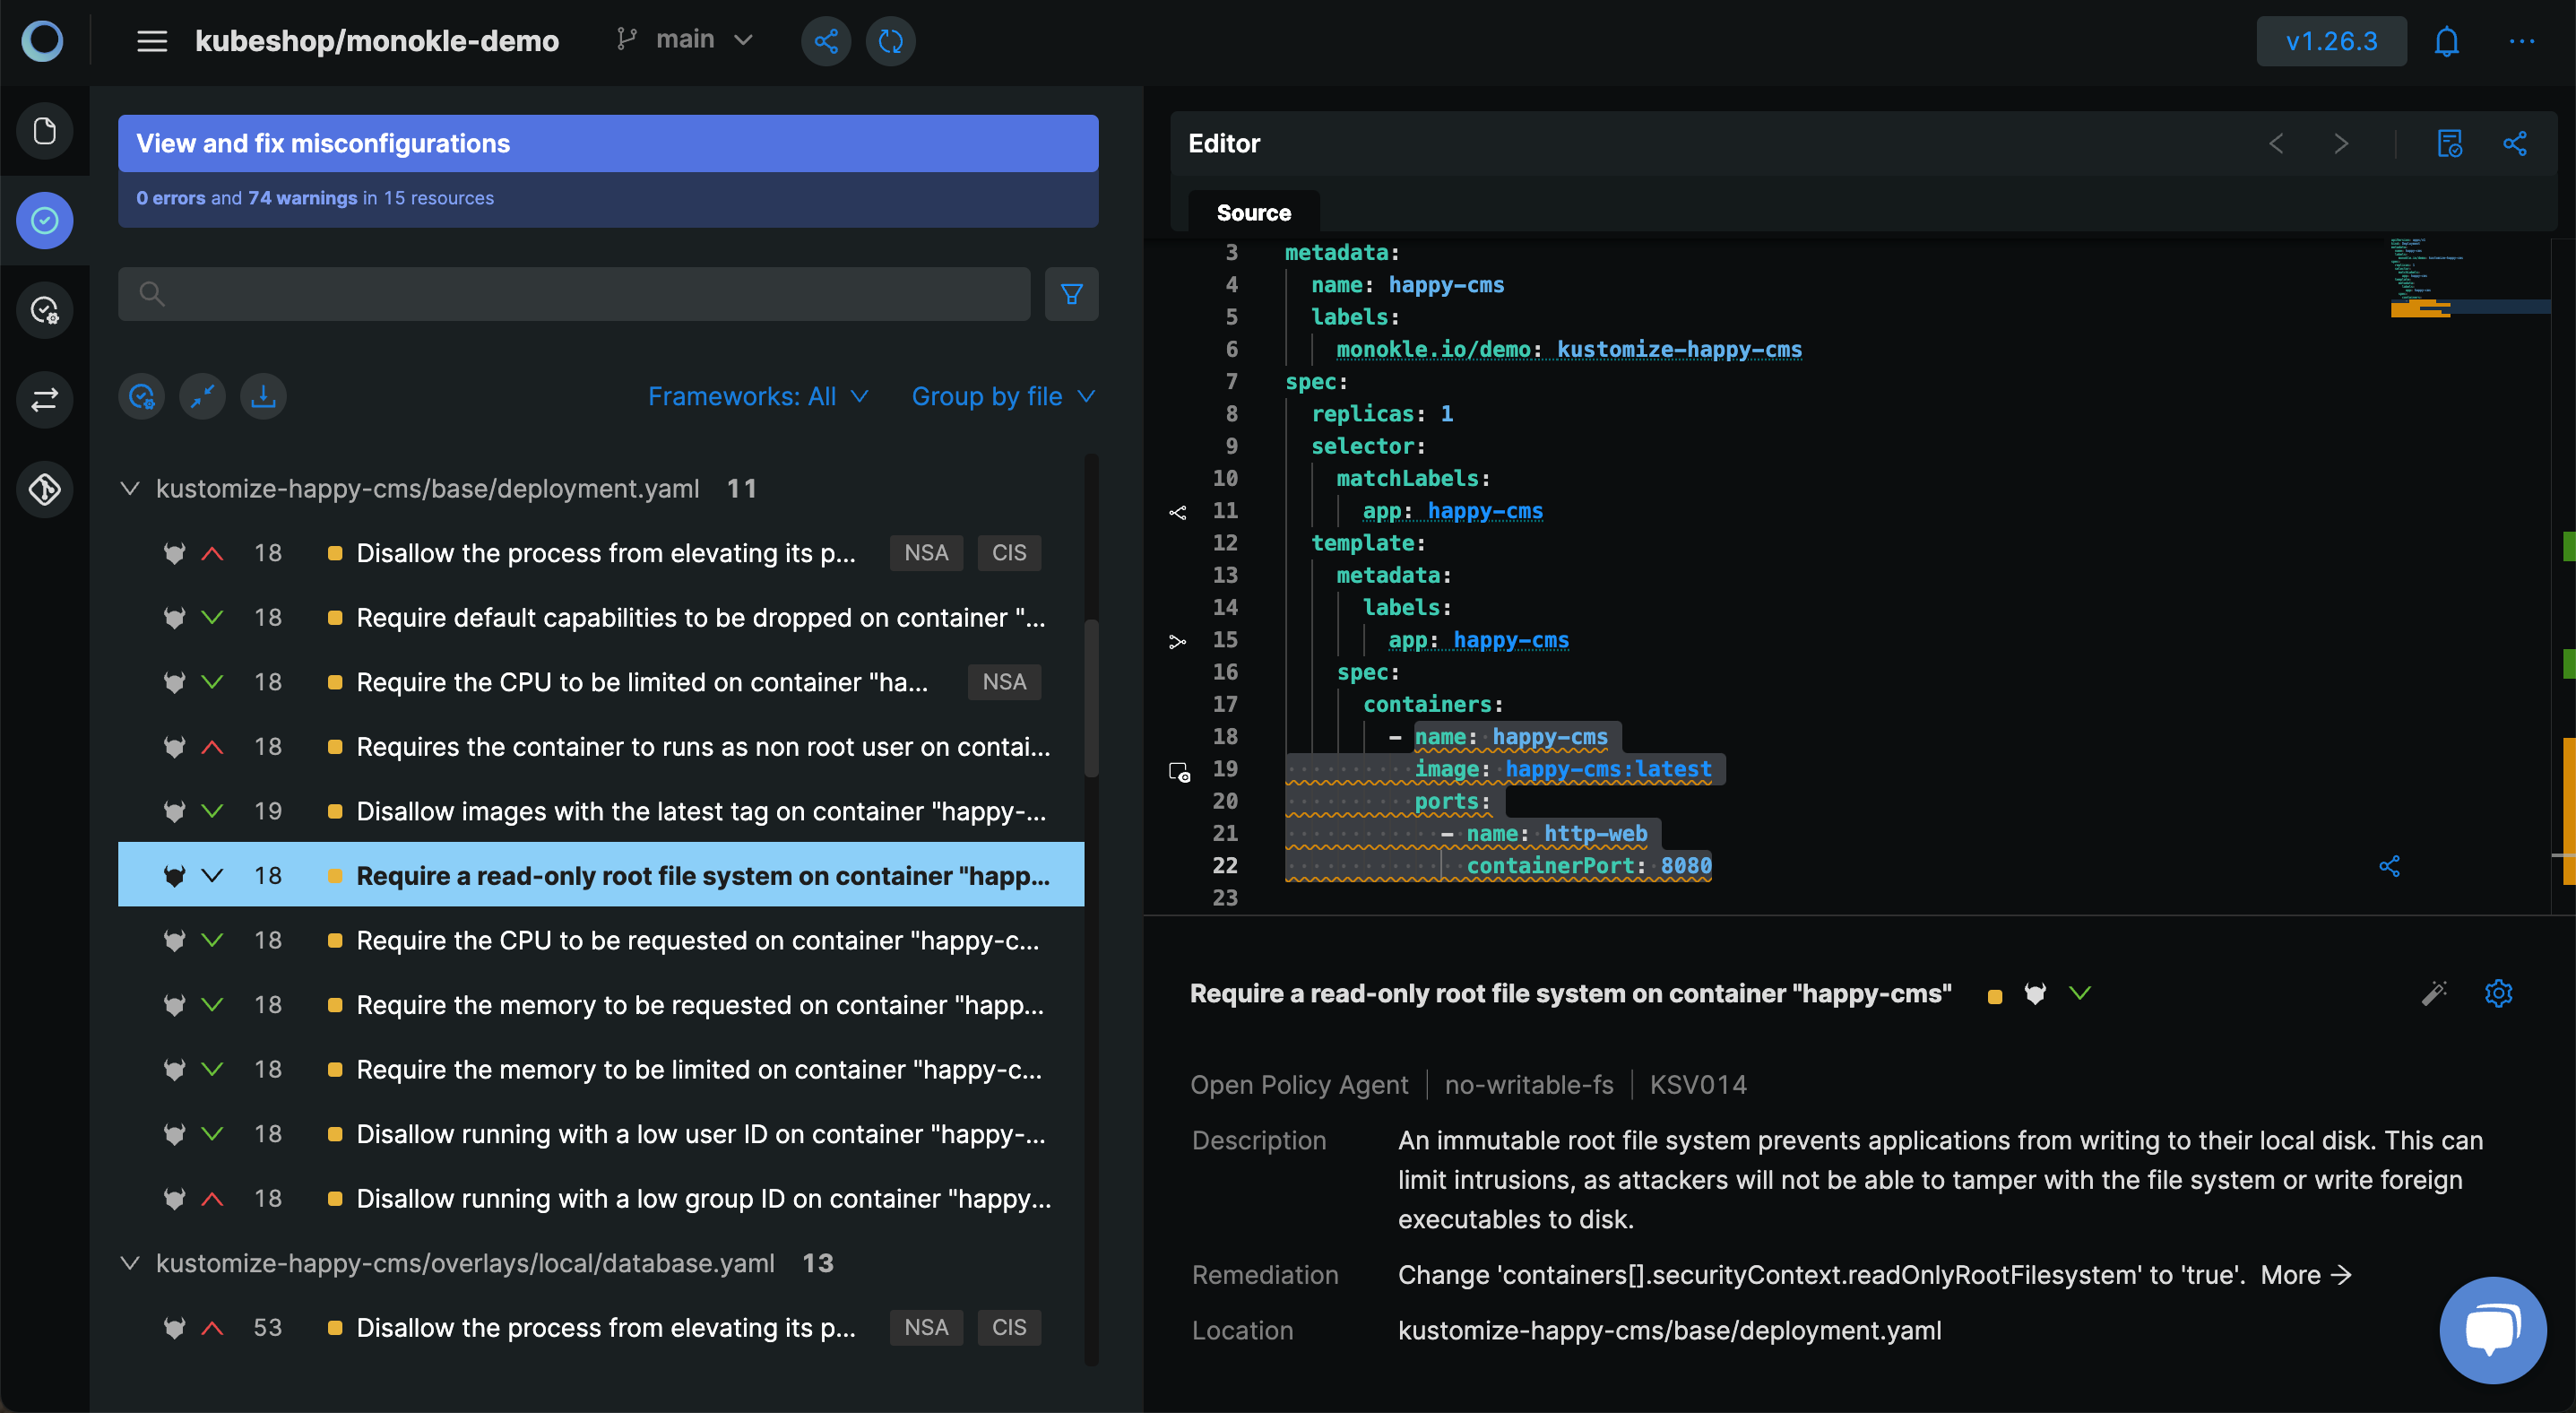
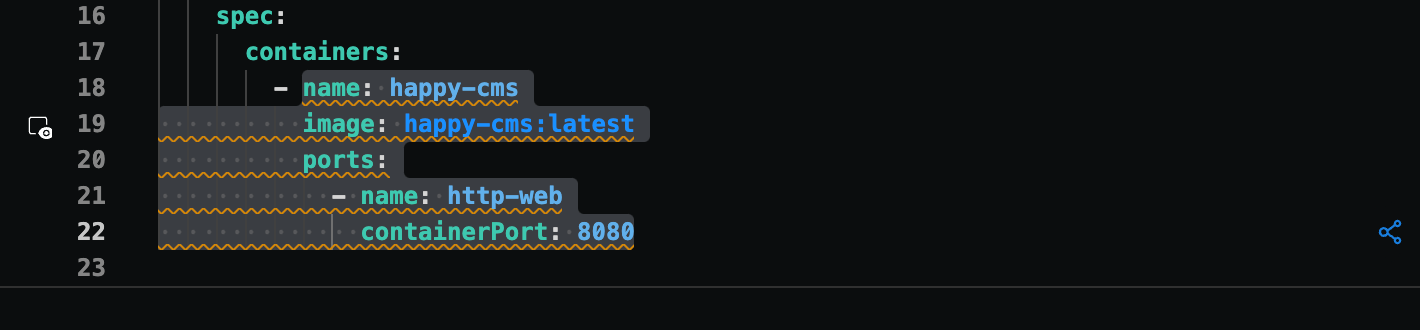
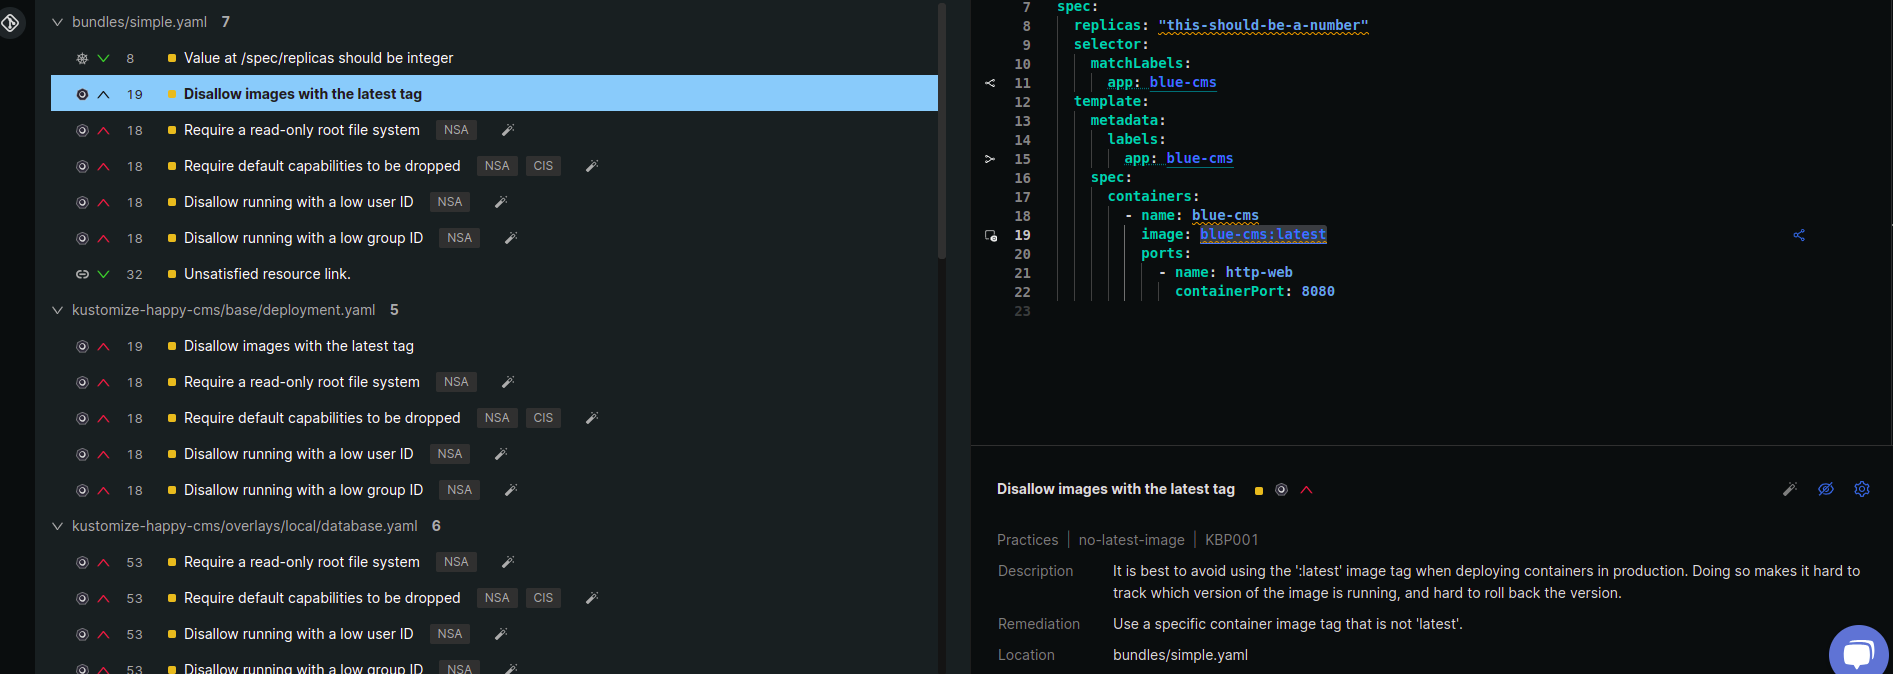
- Monokle Cloud shows the list of policy violations segregated on the basis of resources. Select a policy violation warning to view the code block that has a misconfiguration in the Editor and suggestions to fix it.
Since there are multiple warnings for a single resource in the cluster configuration, let's focus on one warning and see how we can resolve it.
- Monokle highlights the code block which has the policy violations in the Editor.
- Monokle provides a description of the warning and suggestions to fix it.
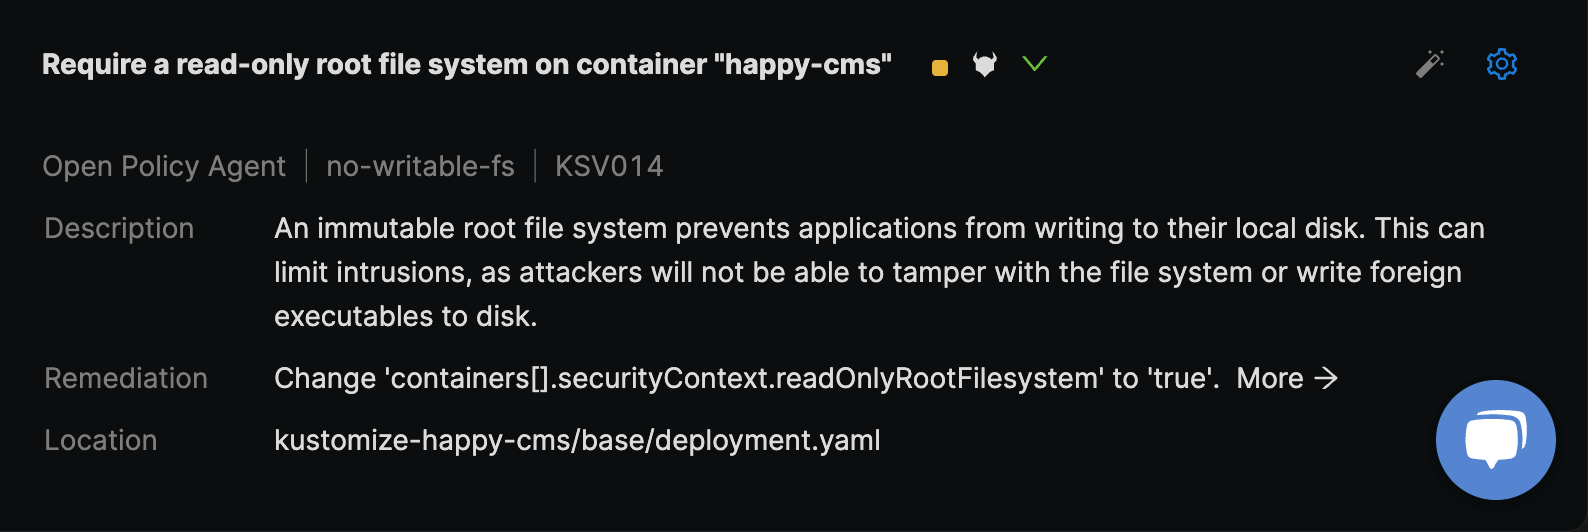
These changes can be manually done in the Editor to fix the warning. To save the effort of making manual modifications, Monokle has automated this process by providing a magic wand that can fix this warning with the same remediation mentioned above.
- In the View and Fix Misconfigurations section, beside each warning, Monokle shows a magic wand if it can be automatically fixed. Select the magic wand.
Monokle strikes the warning to ensure that the change has been made.
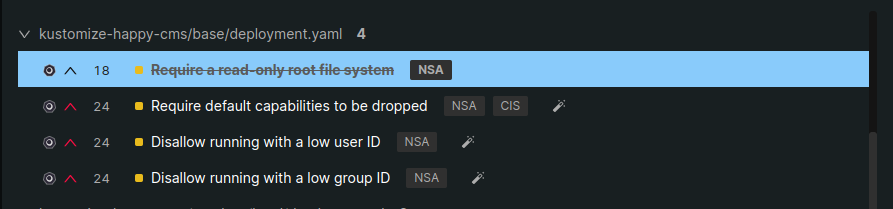
In the Editor, you will see the modifications done by Monokle to fix the misconfiguration.
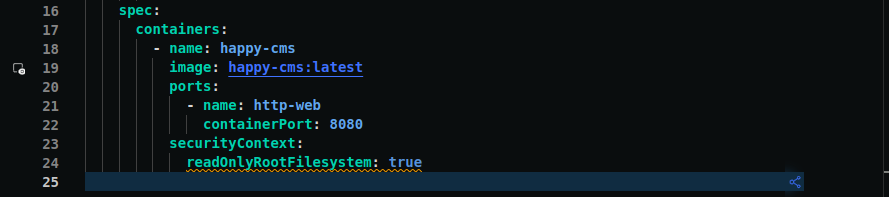
In the above image, we can see a new line has been highlighted in the Editor for policy violations. Monokle runs the policy checks in real-time and reports them.
- As the code block highlights the warning for Line 24, let's make use of the auto-fix feature to fix all the warnings for this resource.
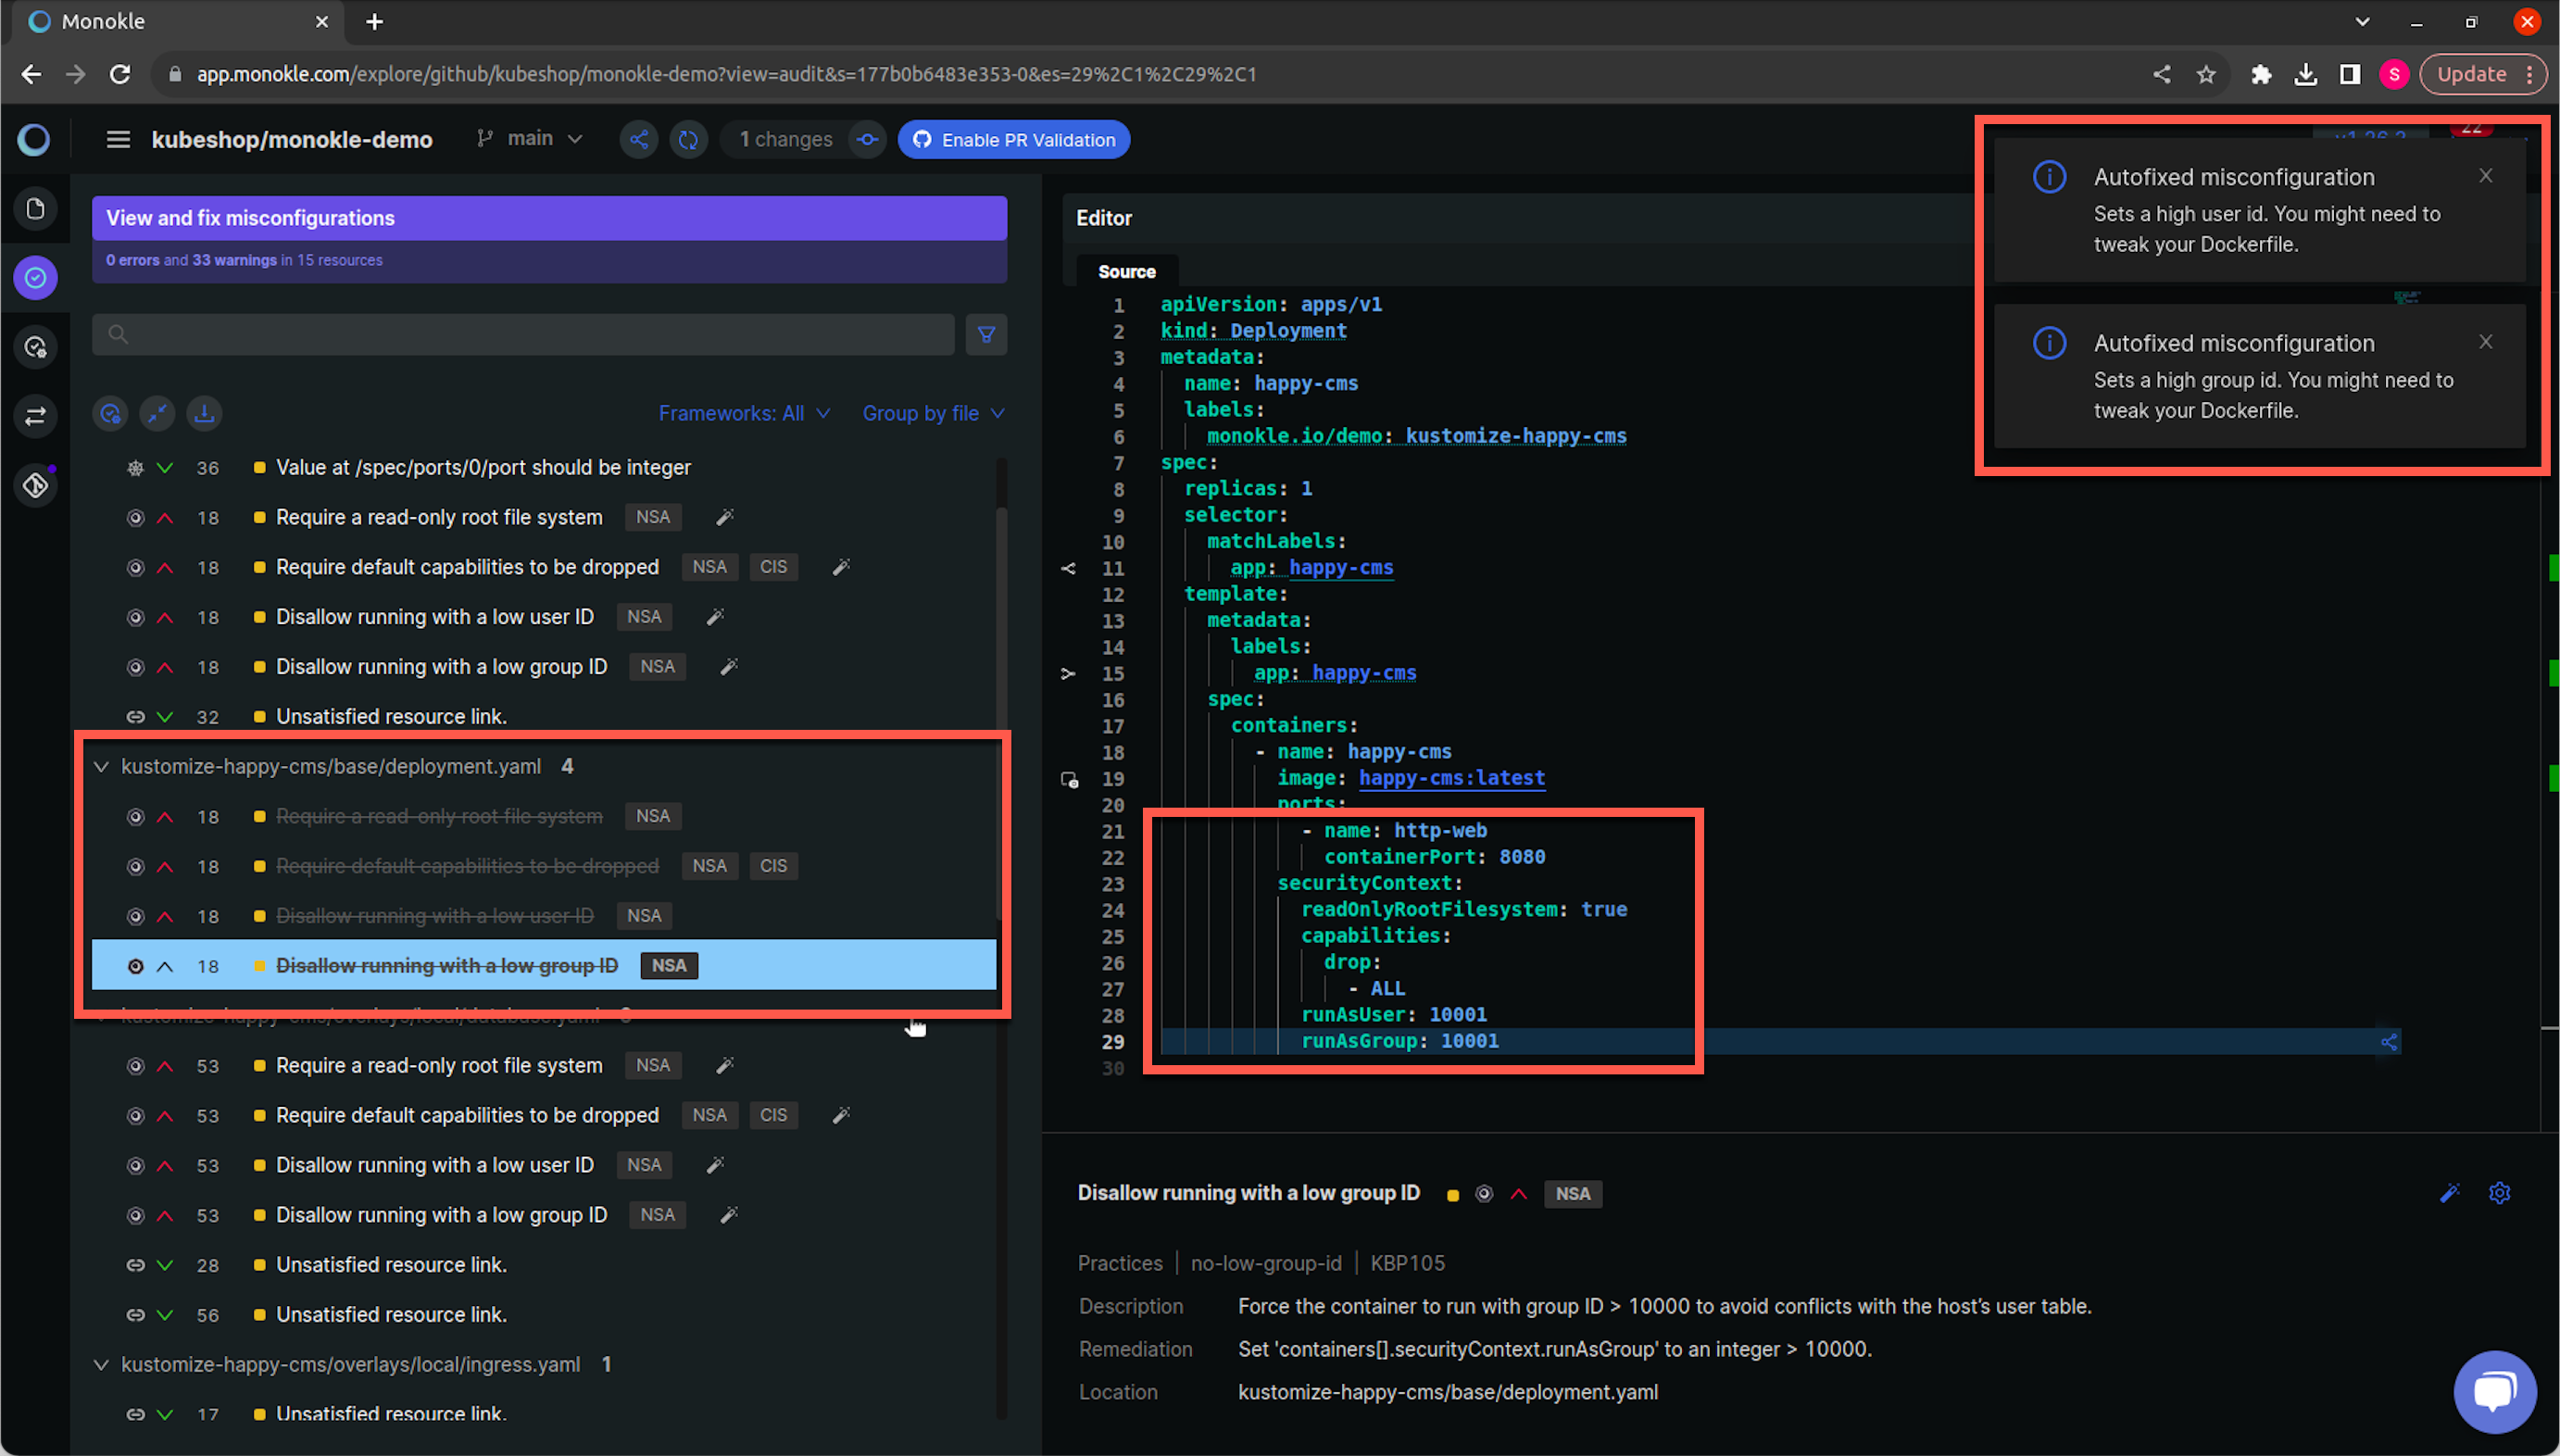
After all the warnings are fixed, Monokle makes the modifications in the respective file and removes the warning, and shows notifications when warnings are fixed for your reference. You can raise a PR to merge these changes to the repository with Monokle.
Monokle shows notifications when changes are made to fix misconfigurations. These notifications contain crucial information like relevant changes that are required in Dockerfile or for other dependencies.
Suppress False Positives with Monokle Cloud
When you are looking at a misconfiguration, you might not be able to fix it because of the following reasons:
You might decide that a specific misconfiguration doesn't need to be fixed. For example, usage of the latest image tag. However, it is not a recommended practice since the latest image versions could have some incompatibility issues with your application. Hence, it is always suggested to use a stable release.
You might notice that your service needs specific permission meaning you are dealing with a case-specific false positive. For example, running a container with no CPU limit.
In these cases, suppressions allow you to hide the problem until further notice.
Methods of Suppressions
Fingerprint-based Suppressions
For every warning, Monokle creates a unique fingerprint and stores it in a database. So when you suppress a warning using fingerprint-based suppressions, Monokle checks against this database and updates the suppression status for that particular rule, and suppresses the warning.
The benefit of using this approach is that you don't have to make any changes in your Kubernetes resources to suppress a warning. This also allows Monokle to enforce policies in real time.
Fingerprint suppressions are limited only to projects at the moment.
Annotation-based Suppressions
Annotation-based suppressions are inline suppressions that require changes to the Kubernetes resource configuration to suppress a rule on a specific resource. The suppression can be enabled using the monokle.io/suppress annotation along with the ID of the rule andalong with the plugin to be suppressed. Since these changes are local, it has to be pushed to the project repository to make it persistent.
Get Started With Monokle’s Suppression Feature
Monokle allows you to suppress warnings and make necessary changes to your files. This can be done in the following ways.
Fingerprint-based Suppression
Monokle provides an icon beside each rule for the resource to suppress or unsuppress a rule. Monokle also has a hotkey to apply suppression. Select the rule and press s to suppress or unsuppress a rule.
Let’s see the steps to suppress a rule for a resource using Monokle:
- Click on “View and fix misconfigurations” in the menu bar.
- Monokle Cloud shows the list of policy violations segregated on the basis of resources. Hover over the warning or error and the suppression icon will appear to suppress the rule.

- Click on the
Suppress ruleicon to suppress the rule. Once suppressed, the rule will no longer be applied to that resource but will still be applicable to other resources in the repository or project. With this, Monokle helps you decide which policies will be uniquely applied to your Kubernetes resource.

You can use the same icon to un-suppress the rule by hovering over it and clicking on it.
Only the admin has the authority to approve or directly suppress a policy violation in a project. All other team members can make use of the feature in a similar way but it will not be applied across the project unless an admin approves it. With this, Monokle makes it easy to make fingerprint-based suppression and provides control to the admin over the policy enforcement on the resource.
Annotation-based Suppression
Annotation-based suppression requires you to make changes to the source code of resource configuration. To suppress a rule using annotations, you need to find the identifier for the rule. Once that is done, you can add annotations to resource configuration with identifiers using the following template:
annotations:
    monokle.io/suppress.<plugin and rule identifier>: <Reason to suppress>
Let’s see how to suppress rules for a resource using annotation-based suppression in Monokle:
- Select the rule for the resource that you want to suppress. Monokle loads the remediation overview and editor.
- In the remediation section, Monokle shows the rule that is applied to the resource and shows policy violation.
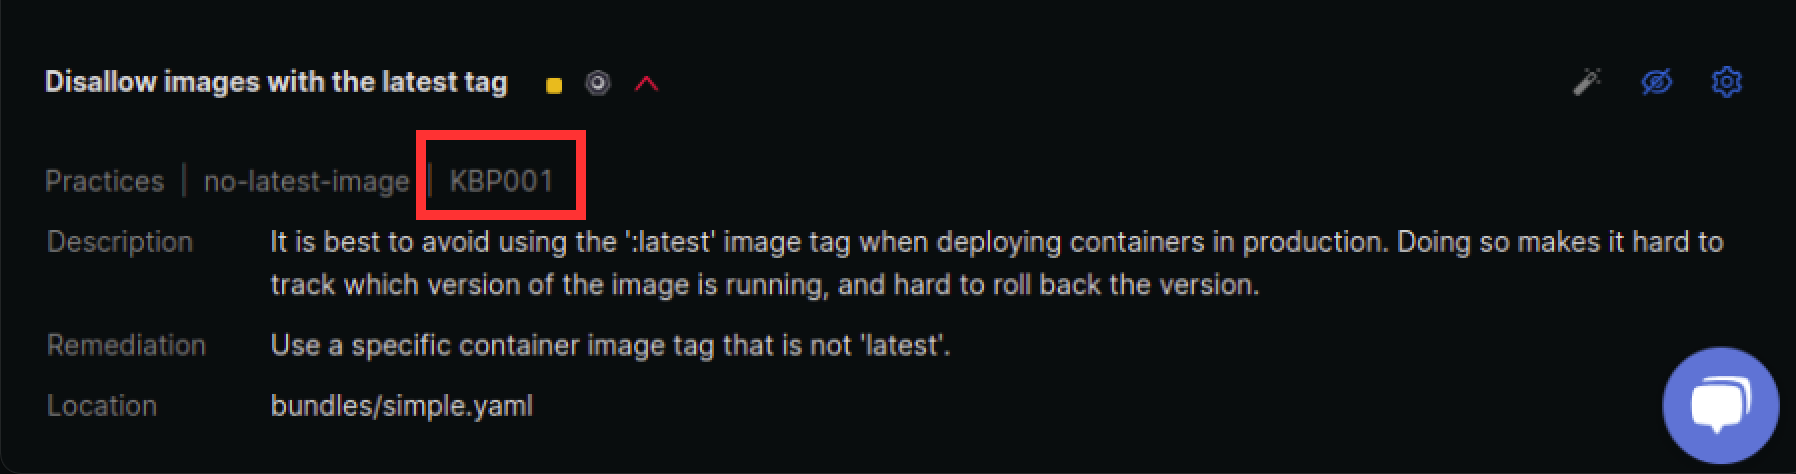
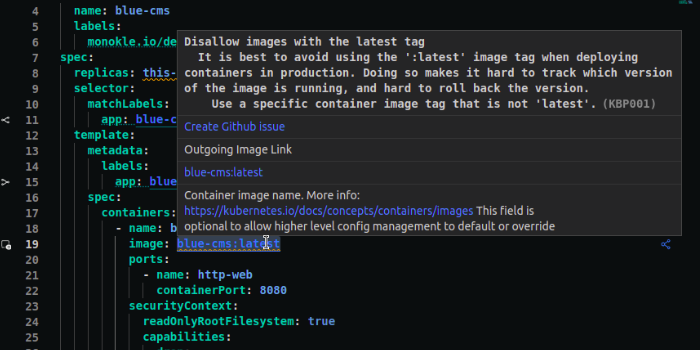
For this rule, the plugin identifier or rule identifier is KBP001.
- Before suppress: Monokle highlights the policy violation and shows a dialogue box when you hover over the line that has the violation as shown below.
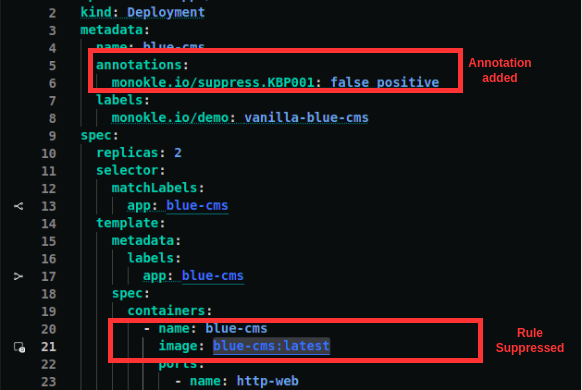
- Add annotations: In your source code for the resource add the following annotation in metadata:
annotations:
    monokle.io/suppress.KBP001: false positive
You can use the editor to make the changes to the resource configuration. You will notice as soon as you add the annotation, Monokle does not show the policy violation anymore.
- After Suppress: Monokle no longer highlights the policy violation as a warning or error.
These changes are currently local so, in order to make it persistent, you need to push it to your repository or raise a PR to proceed with the merge of rule suppression for this resource across the team. Monokle provides the solution to easily push changes or raise a PR to merge changes in your repository.
We have seen that Monokle helps to remediate recurring/common policy violations by providing the power to auto-fix or suppress them. It's a smart way to handle false positives by suppressions instead of making the teams ignore the warning, allowing a standardised code base and consistent policy enforcement.