Create Custom Policy & Plugin to Validate Memory Consumption
In the last tutorial, we explored how to enable default policies in Monokle. Policies help check for schema violations and adhere to standard Kubernetes practices. In addition to default policies, custom policies can also be created in Monokle.
Terms to Know
Custom Policy: A custom policy is a set of rules to ensure an application complies with your organization’s requirements. Custom policies can be written in programming languages like Go or Typescript. Monokle Cloud provides the capability to enable these custom policies as a plugin to validate your application’s YAML configurations.
Plugin: A policy or any utility can not be directly imported into an application. You need to package it. A plugin is a package of utilities like policies for validation along with its metadata.
In this tutorial, you will learn how to write custom policies using the Typescript programming language and enable them in Monokle Cloud as a validation plugin making it easier to validate your YAML configurations.
Use Case
Create a policy capable of checking the memory consumption of deployment resource containers. Complying with this policy will limit the developers from exceeding the optimum resource utilization.
Prerequisites
- Install npm and node.
- Sign up or sign in to Monokle Cloud.
- Configure a repository.
Preconfiguration
To create custom plugins which will contain your written policies, Monokle provides a library to get started with setup and a developer mode. The developer mode imports the plugin setup on the development server. In this tutorial, the development server will be your local machine. Enable the developer mode and initiate the plugin setup.
Enable Developer Mode
Enable developer mode to allow interaction with the policy plugin in Monokle Cloud. Once enabled, you can configure the plugin after development. To get started, select your Kubernetes resources repository for which you want to enable validation in Monokle Cloud.
Select the validation icon from the Toolbar, scroll to the bottom in Validate your resources pane, and click on the toggle button to enable developer mode.
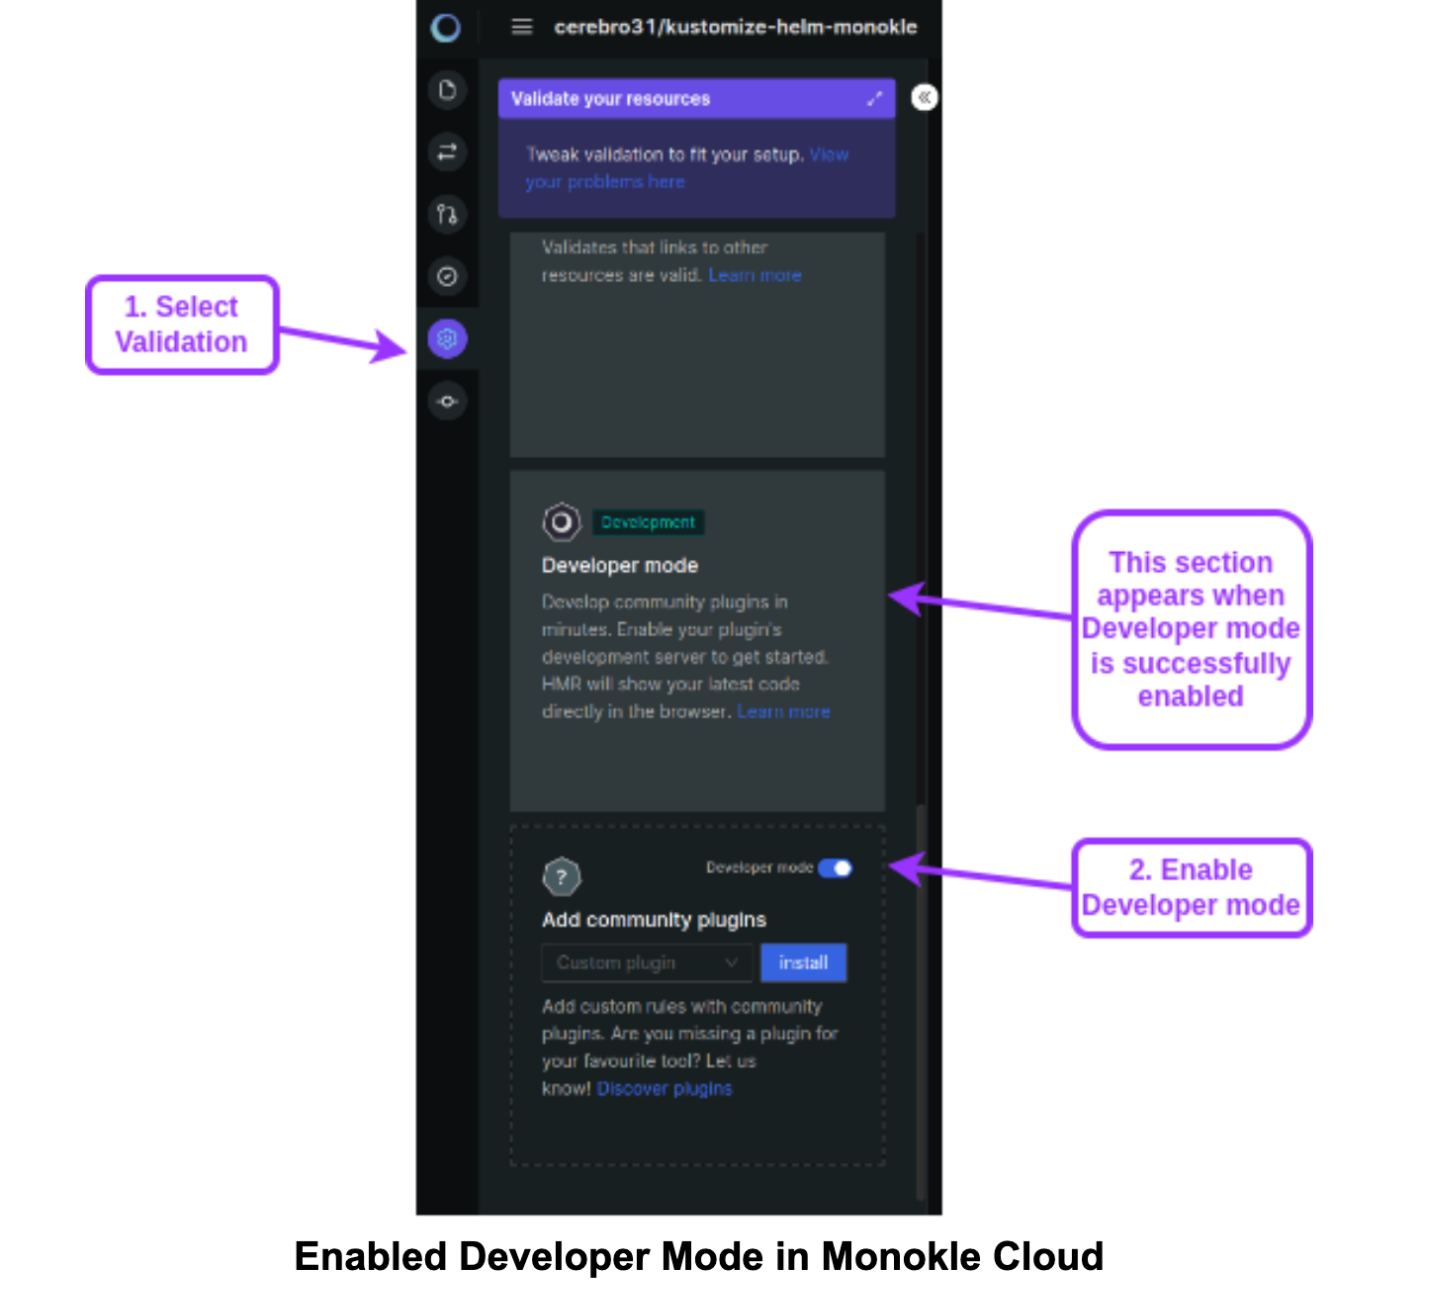
Great! Now that developer mode is enabled, when you run the development server on your local machine, Monokle will automatically sync the changes you make in the plugin in real-time.
Setup Plugin
Clone the GitHub repository of the library.
$ git clone https://github.com/kubeshop/monokle-core.git
Change the directory to create-monokle-plugin directory and initiate the creation of the plugin package using the following commands:
$ cd monokle-core/packages/create-monokle-plugin/
$ npm create monokle-plugin@latest
This will initiate the plugin setup in interactive mode as shown below:
$ npm create monokle-plugin@latest
✔ Plugin name: … resource-limit
✔ Select a plugin type: › validation
✔ Select a variant: › validation-ts
✔ Select a template: › basic

Scaffolding plugin in /kubeshop/test_setup/resource-limit...

Done. Now run:

  cd resource-limit
  npm install
  npm run dev
Let’s dig into what happens in each of these steps.
- Plugin name: Enter the plugin name and press enter.
- Plugin type: Monokle currently supports validation plugins. Press enter to use the default value.
- Variant: Select the variant or the programming language of your policies. Monokle currently supports Typescript. Press enter to use the default value.
- Template: Monokle provides some template files to get started with writing the policies.
- basic: Contains a sample plugin with a simple rule in Typescript.
- with-custom-crd: Contains a sample Typescript plugin using a Custom Resource Definition.
You can continue pressing enter for each step further as Monokle takes care of filling in all default values.
Once the plugin setup is complete, a directory will be created with the plugin name provided that contains the package for the plugin.
Install the Plugin Package
Change the directory to the newly created directory for the plugin and initiate installation.
$ cd resource-limit/
~/resource-limit$ npm install

> resource-limit@1.0.0 postinstall
> npm run codegen


> resource-limit@1.0.0 codegen
> monokle-plugin-toolkit codegen

added 166 packages, and audited 167 packages in 5s

14 packages are looking for funding
  run `npm fund` for details
Understanding Autogenerated Files
With the above steps, all the dependencies to develop a plugin are installed. Let’s view and understand some of these files that are essential for plugin development.
~/resource-limit$ ls
node_modules  package.json  package-lock.json  README.md  src  tsconfig.json
package.json: Contains basic information about the plugin package which includes:name: A unique name of the plugin package directory.author: Name of plugin author/organization.license: Standard license.version: Current version of plugin package. This needs to be updated based on your release plan.main: Path to the plugin.scripts: Supported commands.dependencies: Package dependencies.
/src/plugin.ts: This is a vital component of the plugin architecture, responsible for the maintenance of the plugin's metadata. Its primary function is to manage and display relevant information about the plugin andrules. The following properties should be set in a call todefinePlugin:id: A unique (internal) identifier for your plugin.name: A unique CamelCase name that will be used as a prefix in configuration files to identify rules in the plugin. -displayName: A user-friendly name for your plugin. -description: A user-friendly description of your plugin. -rules: A comma-separated list of policies that are available in/src/rulesdir.
/src/rules: The directory that contains the custom policies written in Typescript. Each policy needs to be defined with a call todefineRulewith the following properties:id: An internal id for your policy.description: A text to show if this policy fails.help: A text telling how to fix your errors for this policy.validate: Implementation of the policy.
For detailed information, feel free to check the plugin and validator metadata.
Modifying Plugin Files
The package.json maintains the package details. Update author in package.json for the unique identification of who is maintaining the package.
{
  "name": "resource-limit",
  "author": "Tom",
  "description": "Validates with custom rules.",
  "license": "MIT",
  "version": "1.0.0",
  "main": "dist/plugin.js",
  "type": "module",
  "scripts": {
    "postinstall": "npm run codegen",
    "codegen": "monokle-plugin-toolkit codegen",
    "dev": "monokle-plugin-toolkit dev",
    "build": "monokle-plugin-toolkit build",
    "debug": "monokle-plugin-toolkit build --debug"
  },
  "dependencies": {
    "@monokle/plugin-toolkit": "^0.1.0"
  }
}
In the above codebase for package.json, we have updated the author value from unknown to maintainer name Tom for example purposes.
Next, update /src/plugin.ts which maintains the plugin metadata. This information will be visible in Monokle Cloud when the plugin is imported which will help in identifying it.
import { definePlugin } from "@monokle/plugin-toolkit";
import { noEmptyAnnotations } from "./rules/1-example.js";

export default definePlugin({
  id: "YCP",
  name: "ycp",
  displayName: "Resource Limit Check Plugin",
  description: "Optimize your resource utilization!",
  rules: {
    noEmptyAnnotations
  },
});
In the above codebase for /src/plugin.ts, update the displayName and description for the plugin specific to your requirements. Once the file is saved and the development server starts, you should see the custom basic changes in the plugin in Monokle Cloud. Now, let’s head over to the terminal and start the development server.
Run the Development Server
Execute the following command to make the plugin available in Monokle Cloud. This command will start the development server, ensuring that any saved changes to the plugin package are immediately reflected in the Monokle Cloud in developer mode.
~/resource-limit$ npm run dev

> resource-limit@1.0.0 dev
> monokle-plugin-toolkit dev

Monokle dev server (beta)

You can now develop and preview your rules in real-time within Monokle Cloud.

tip: make sure you have developer mode enabled.
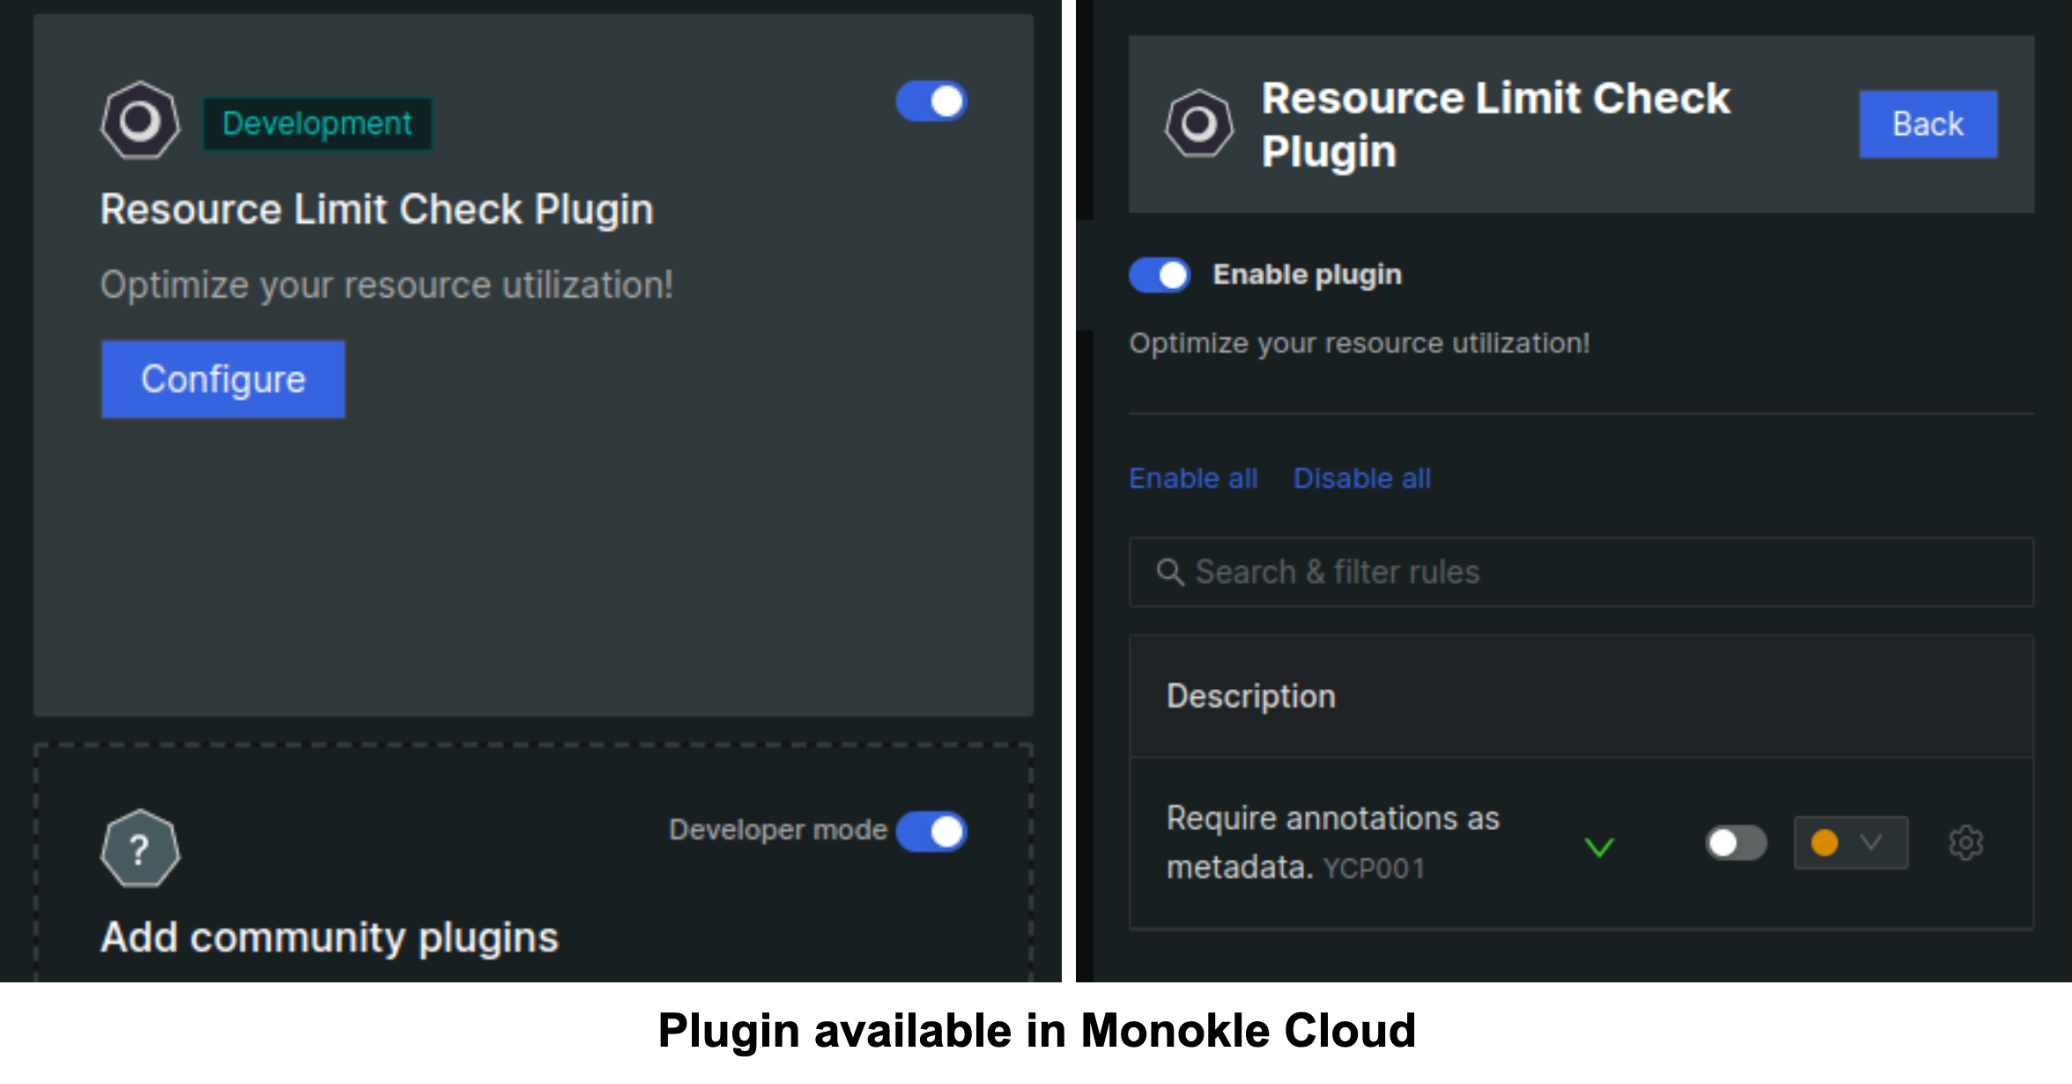
Verify in Monokle Cloud
The custom display information and the default rule are available in Monokle Cloud and can be enabled using the toggle button. Click on Configure to view the default rule.
Write a Custom Policy
Now that the plugin is ready, you can add your custom policy to it. In this section, you will write a custom policy. As per the policy, each Kubernetes deployment resource for the dev environment can only consume 1G of memory.
Create a new Typescript file named 2-ensureMemLimit.ts in the /src/rules directory. Import function defineRule which will be used for defining the policy rule. Set a name for the policy and get started with writing the policy. The defineRule function takes a unique ID, a description, help text, and the validation rule.
In this rule, for each deployment resource, check for the memory limit of containers. The value allowed for memory consumption is 1G. In case the value does not match, report a violation of policy along with the line where the violation is happening. All the configuration files in this setup are available on GitHub.
import { defineRule } from "@monokle/plugin-toolkit";
import { isDeployment } from "../schemas/__generated__/deployment.apps.v1.js";

export const ensureMemLimit = defineRule({
  id: 2,
  description: "Please ensure mem limit is set to 1G for dev env deployments",
  help: "Values allowed less than 1G",
  validate({ resources }, { report }) {
    resources.filter(isDeployment).forEach((deployment) => {
      const containers = deployment.spec?.template?.spec?.containers;

      if (containers) {
        for (const container of containers) {
          const resources = container.resources;
          if (resources && resources.limits && resources.limits.memory) {
            if( resources?.limits?.memory !== '1G' ){
              report(deployment, { path: "spec.template.spec.containers" });
           }
          }
          else {
            report(deployment, { path: "spec.template.spec.containers" });
          }
        }
      }
    });
  },
});
Save the file. The policy created above that contains the rule needs to be imported into the plugin.
Import the Custom Policy and Package as a Plugin
/src/plugin.ts maintains the plugin metadata including the display information and rules. Add the policy by importing it to the rule path as shown below and adding the rule in rules:
import { definePlugin } from "@monokle/plugin-toolkit";
import { noEmptyAnnotations } from "./rules/1-example.js";
import { ensureMemLimit } from "./rules/2-ensureMemLimit.js";

export default definePlugin({
  id: "YCP",
  name: "ycp",
  displayName: "Resource Limit Check Plugin",
  description: "Optimize your resource utilization!",
  rules: {
    noEmptyAnnotations,
    ensureMemLimit
  },
});
Save both files that have the policy and the plugin metadata. Run the development server in the terminal. That should allow you to directly view and manage the plugin in Monokle Cloud.
Enable the Custom Policy Plugin
Open Monokle Cloud in the browser and click on the validation icon in the toolbar to access the validation setup. The new plugin is added, and the policy is enabled to apply to the manifest. For verification purposes, change the memory limit value and see if a warning is returned.
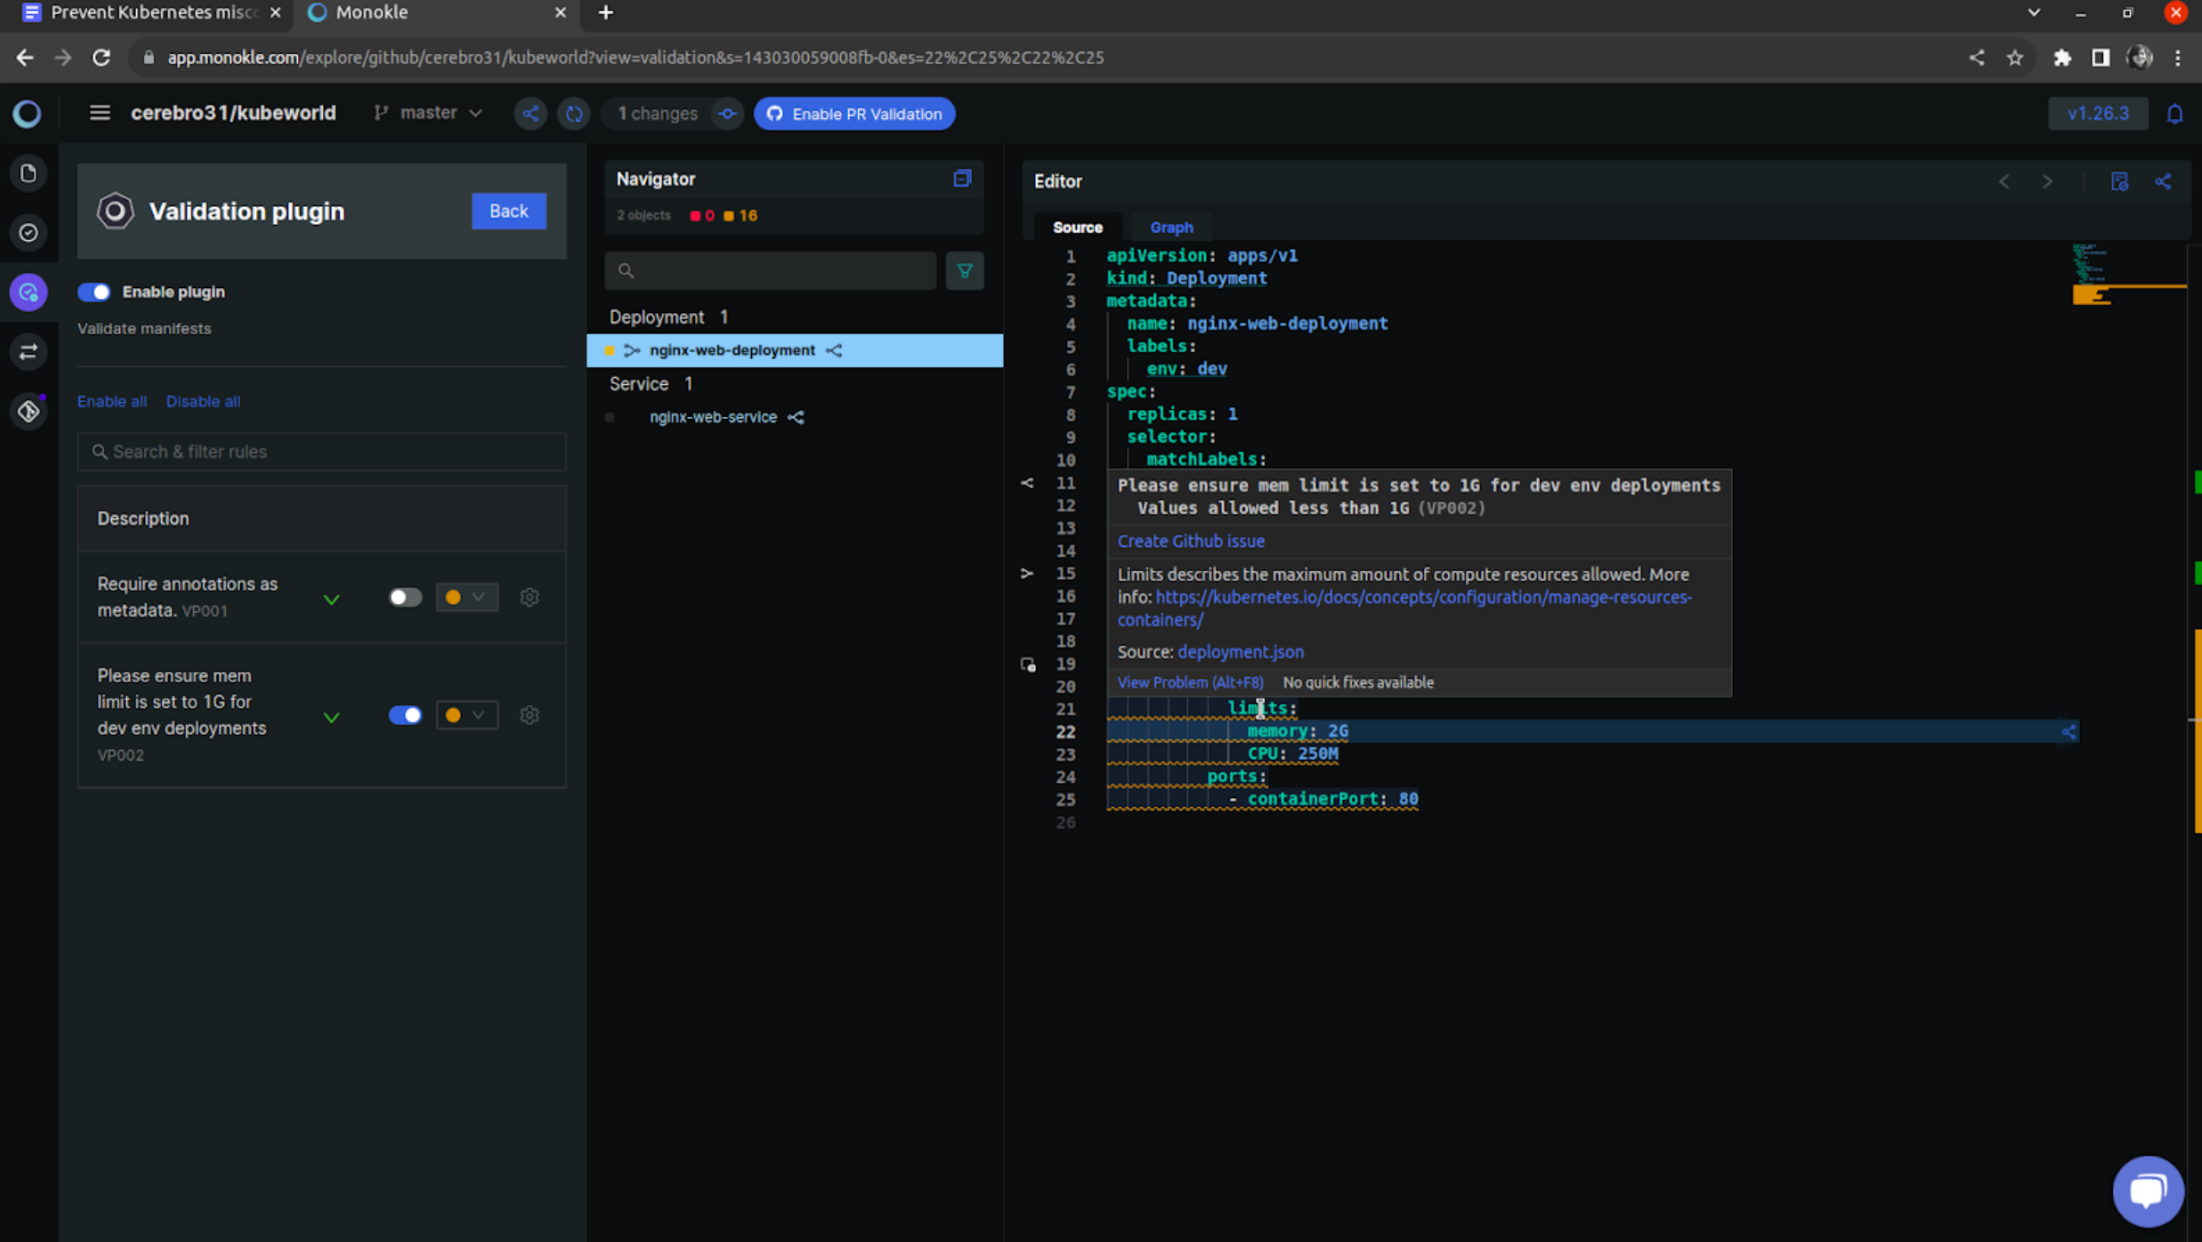
Congratulations!! Your own memory consumption validator is ready to use. The policy is set to notify as a warning when a violation of your custom policy happens. Monokle Cloud clearly highlights the issue with a warning sign along with a simple description and a helpful dialogue text box to assist all project members in setting the memory limit to a maximum of 1G as established by the custom policy you created and plugged into Monokle.