How-to Integrate with Jenkins
Monokle Cloud is a policy administration point which centralises the management of policies. You will learn how to integrate with Jenkins in this tutorial. To accomplish this, you will glue it together with Monokle CLI for enforcement in your CI pipelines.
Objectives
- Learn to integrate Jenkins with Monokle CLI.
- Connect your pipeline with a policy defined in Monokle Cloud.
The tutorial is 90% production-ready and will just require a few tweaks to work in your setup.
1. Let’s start by getting Jenkins running
In this tutorial, we will start with a fresh Jenkins deployment. You can use a local minikube cluster or follow along with your own existing Jenkins instance.
# Install Jenkins on a cluster
helm install jenkins jenkins/jenkins --namespace jenkins

# Get the admin password
kubectl exec --namespace jenkins -it svc/debug-jenkins -c jenkins -- /bin/cat /run/secrets/additional/chart-admin-password

# Port forward Jenkins and open it in the browser
kubectl port-forward svc/jenkins-jenkins -n jenkins 8080:8080
Afterward, open http://localhost:8080 and you can enter "admin" for the username and the password you copied from the command above to enter your Jenkins instance.
2. Define the Jenkins Pipeline
Create your first pipeline by clicking New Item in the left sidebar. Continue by entering an appropriate name and selecting the “Pipeline” option.
Jenkins allows you to define your pipeline in Groovy. You can even commit it as a Jenkinsfile to your repository, but for this tutorial, we’ll simply show how you can do it within the Jenkins UI.

In the left sidebar click Configure and select a Pipeline script for the definition. Enter the script below and press Save. Let’s take a look at what happens in this script:
- A custom container gets added to the agent. This container includes the Helm, Kustomize and Monokle CLI binaries.
- Some environment variables are defined to maintain your script more easily.
- The first stage will clone the git repository. For real setups, we would recommend that you use the official git plugin.
- The second step templates the Helm Chart and pipes the rendered output to be validated by Monokle. The dash
-at the end indicates that Monokle should look for input from stdin. Since no policy is configured, the CLI will use a default policy.
pipeline {
    agent {
        kubernetes {
            containerTemplate {
                name 'monokle'
                image 'kubeshop/monokle-cli:latest'
                command 'sleep'
                args 'infinity'
            }
        }
    }

    environment {
        HELM_CHART = "./blue-helm-cert-manager"
    }

    stages {
        stage('Checkout') {
            steps {
                sh "git clone --depth=1 https://github.com/kubeshop/monokle-demo.git ."
            }
        }

        stage('Validate Helm Chart') {
            steps {
                sh "helm template $HELM_CHART | monokle validate -"
            }
        }
    }
}
Once saved you can press "Build Now" to execute the pipeline. When the Kubernetes objects contain errors the pipeline will fail.
You can change this behaviour with the following flags:
--forceto always exit with status code 0 even with errors.--max warnings 10to exit with failure when the given amount of warnings is surpassed. This is useful if you don’t want additional warnings to be introduced and ensure that quality makes a downwards trend.
3. Use a Monokle Cloud Policy
Let’s continue by changing the default policy to one that is managed centrally within Monokle Cloud. To do this, you will need two things: (1) an automation token to authenticate the CLI with the workspace, and (2) a project handle to identify the desired policy.
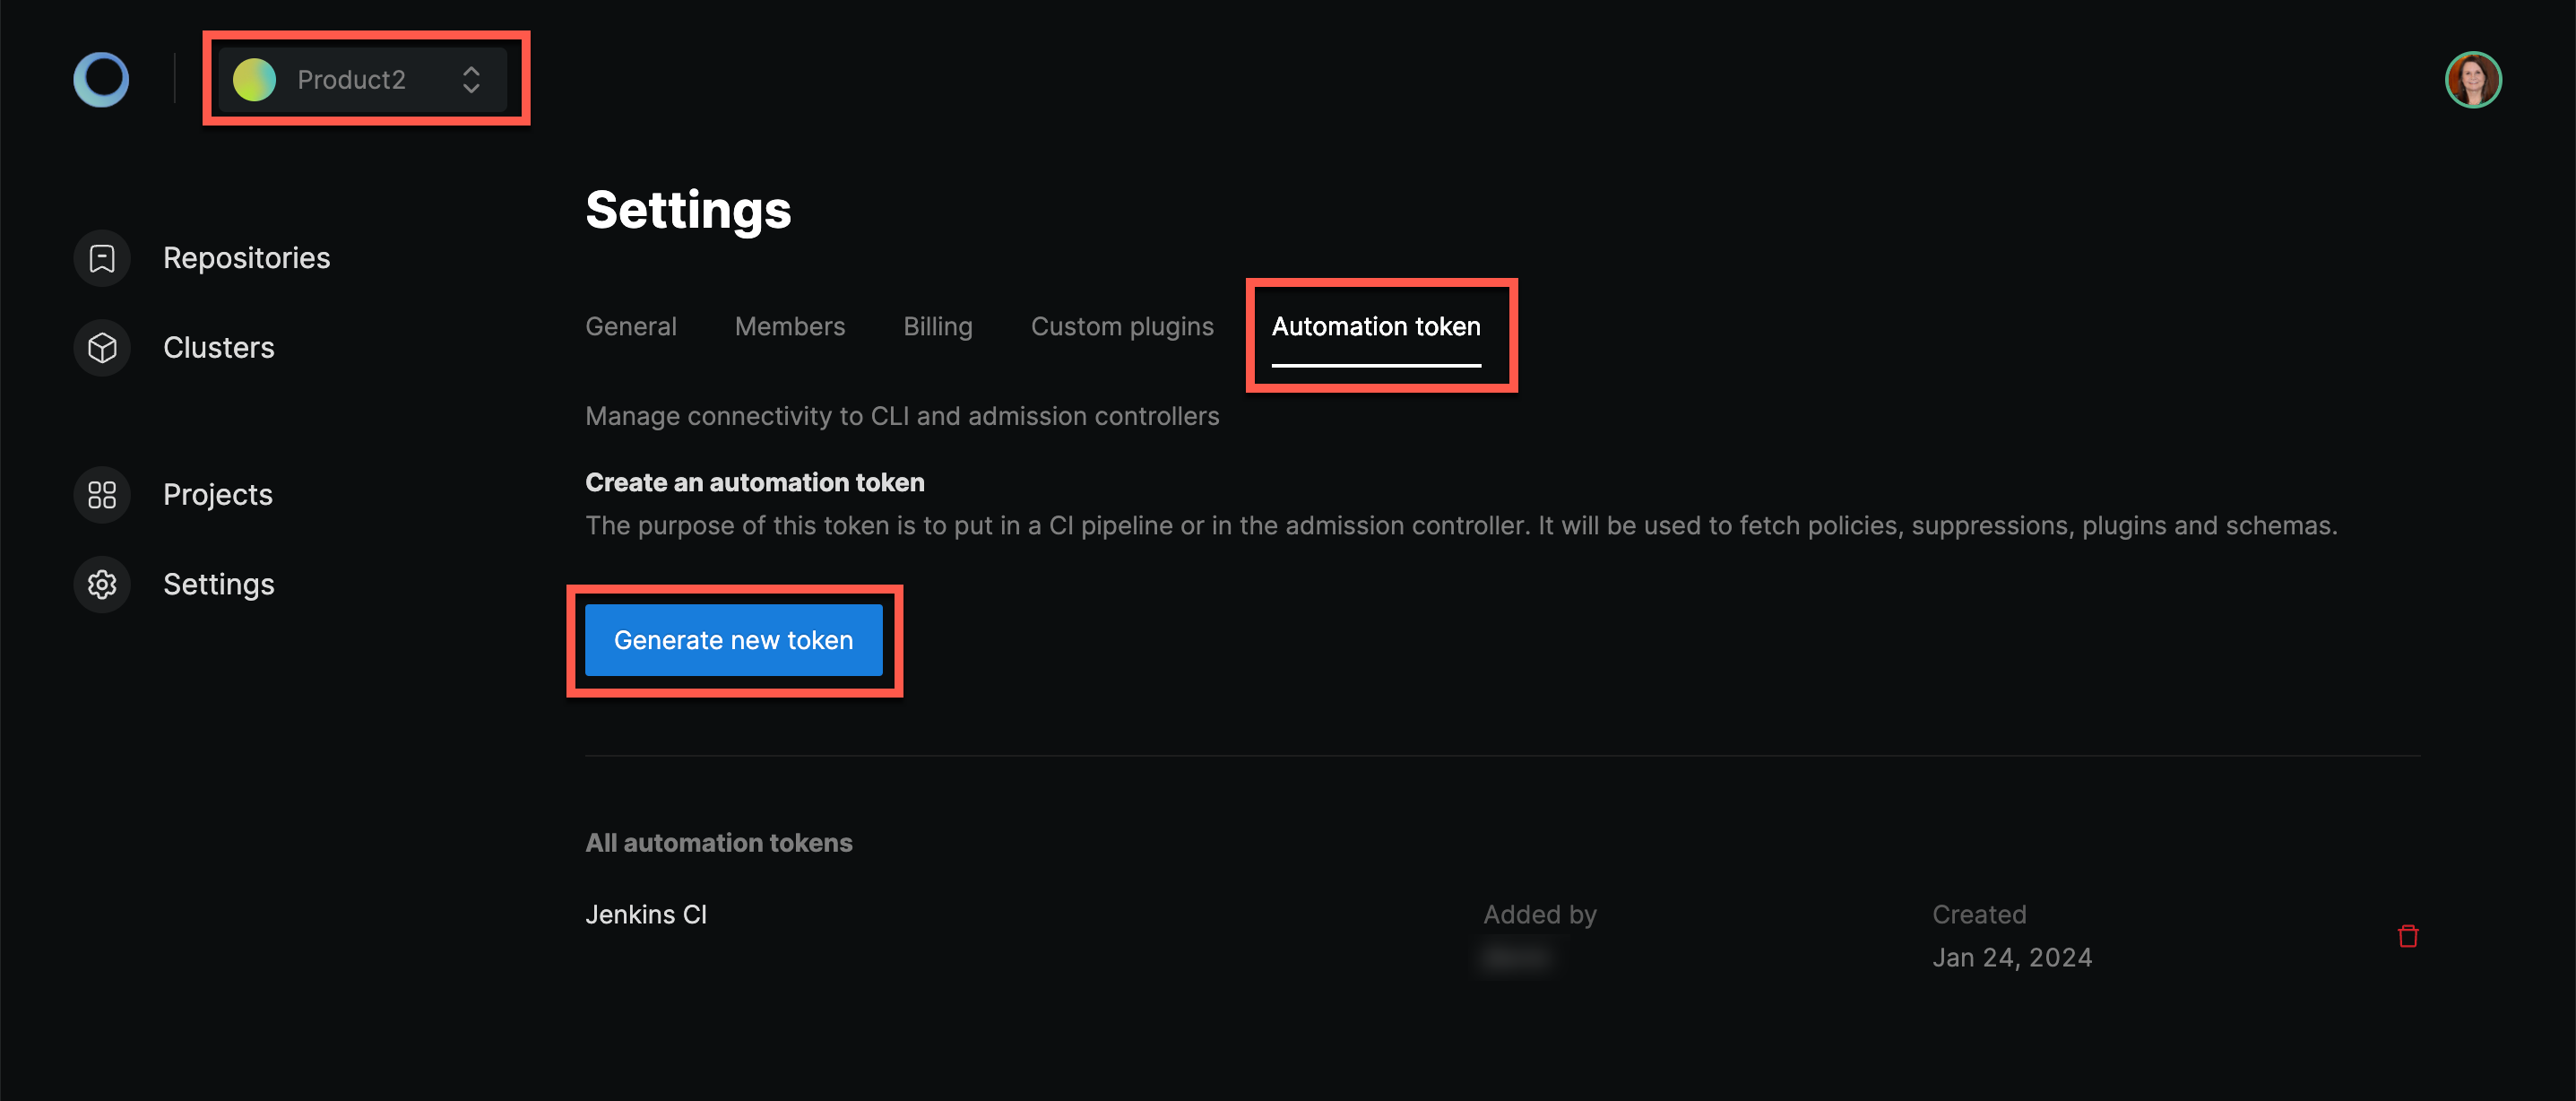
For the automation token, select the workspace from the drop down and go to your workspace’s Automation Token tab. Press Generate after entering a name, for example "Jenkins CI", and an optional description. Take note of the token because afterwards, for security reasons, it will no longer be visible.
For the project handle, navigate to your project which contains your desired policy. Afterwards, take a look at the browser's URL which should look like /dashboard/projects/{project_handle}/repositories.
You can now enter both variables to your pipeline's environment and add the --api-token and --project flags to run against a policy from Monokle Cloud.
  environment {
      HELM_CHART = "./blue-helm-cert-manager"
+      MONOKLE_PROJECT = "your_project_handle"
+      MONOKLE_TOKEN = "your_automation_token"
  }

  stage('Validate Helm Chart') {
    steps {
-      sh "helm template $HELM_CHART | monokle validate -"
+      sh "helm template $HELM_CHART | monokle validate --project $MONOKLE_PROJECT --api-token $MONOKLE_TOKEN -"
    }
  }
4. Extract the Credentials
You should avoid credentials within your Jenkinsfile as this is insecure. Luckily, Jenkins has built-in support for credentials. Let's use that to replace the environment variable.
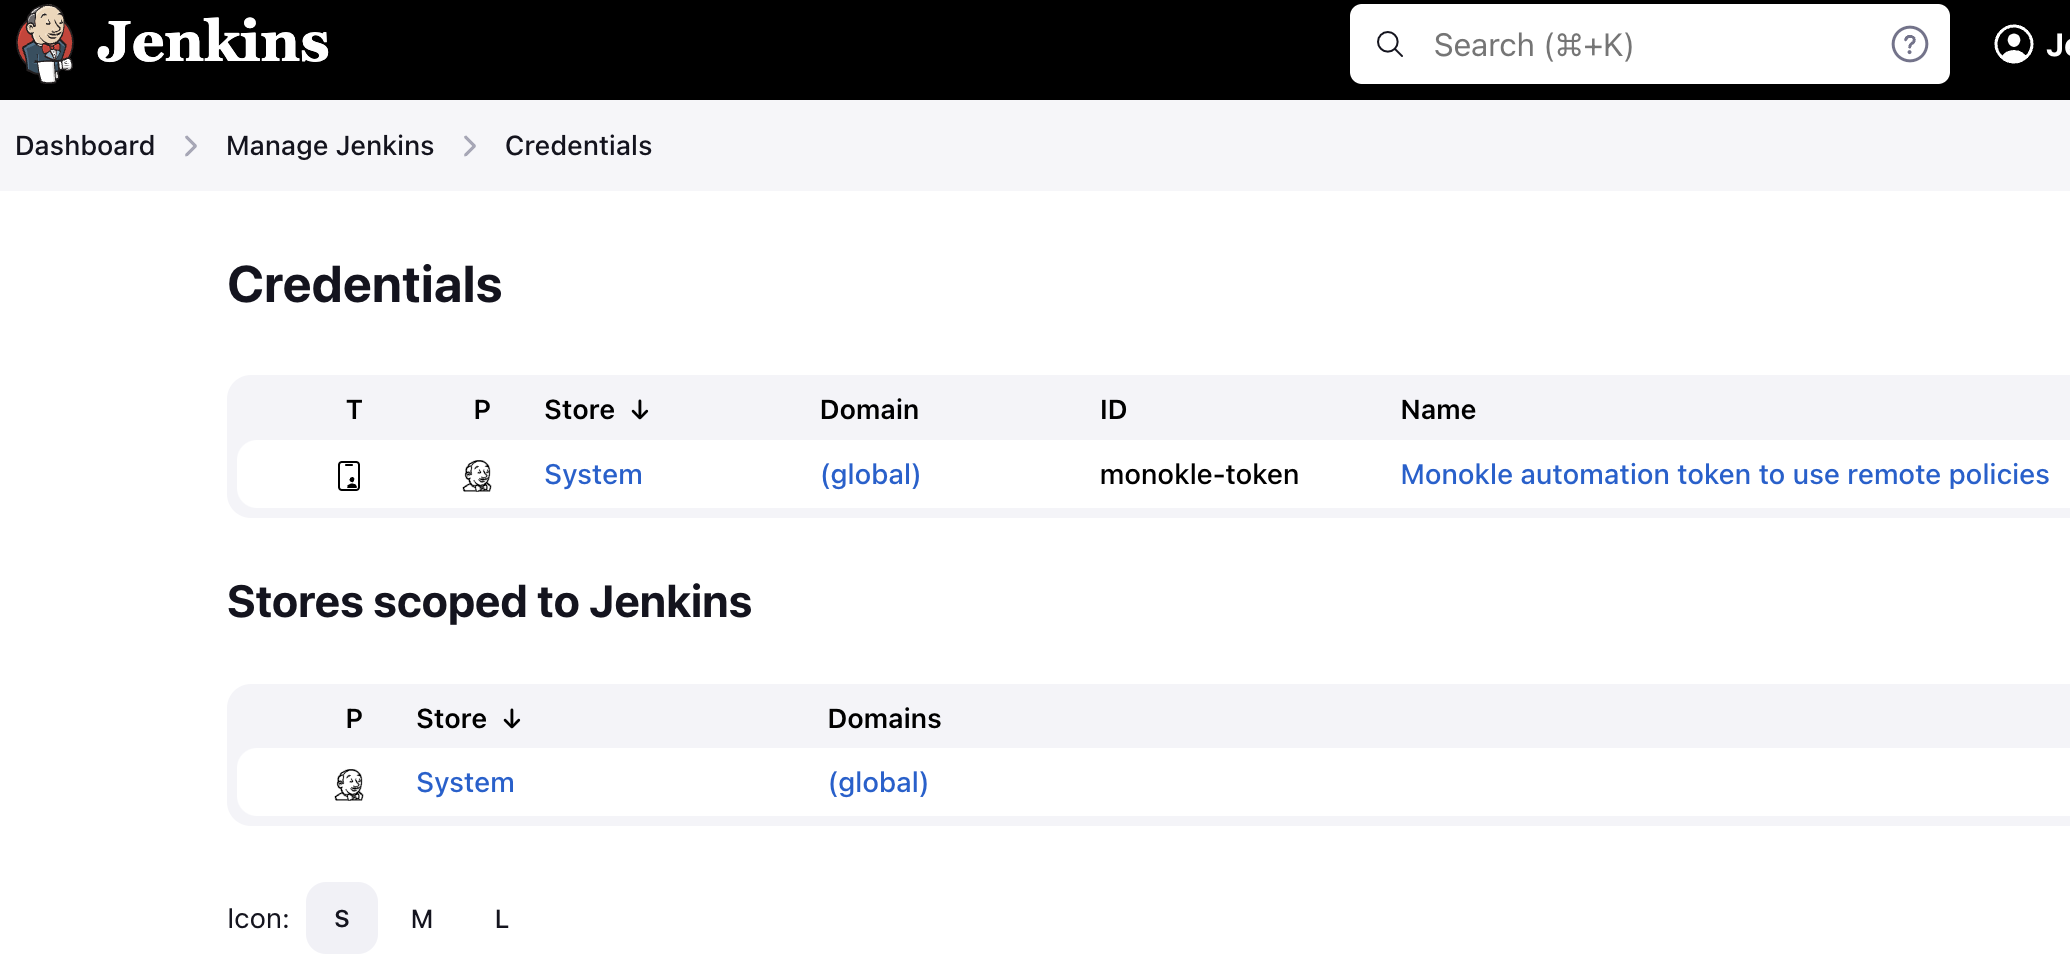
First, create the necessary credentials. To do this, navigate to Dashboard > Manage Jenkins > Credentials. Select your desired store, for example, in a dummy instance under the (global) domain. Press "Add Credentials" and fill in the form: the kind should be Secret Text, the secret should be your automation token, and the identifier can be monokle-token.
With the credential created, you can simply refer to it in your Jenkinsfile.
Use the credentials helper together with the previously given identifier.
  environment {
      HELM_CHART = "./blue-helm-cert-manager"
      MONOKLE_PROJECT = "your_project_handle"
-      MONOKLE_TOKEN = "your_automation_token"
+      MONOKLE_TOKEN = credentials('monokle-token')
  }
Wrapping Up
Putting all these steps together will result in the Jenkinsfile below. With that, you have seen how to validate a Helm Chart and connect with a policy from Monokle Cloud.
Note that you can easily change Helm with any other tool like Kustomize or even just basic YAML files without any templating on top.
pipeline {
    agent {
        kubernetes {
            containerTemplate {
                name 'monokle'
                image 'kubeshop/monokle-cli:latest'
                command 'sleep'
                args 'infinity'
            }
        }
    }

    environment {
        HELM_CHART = "./blue-helm-cert-manager"
        MONOKLE_PROJECT = "your_project_handle"
        MONOKLE_TOKEN = credentials('monokle-token')
    }

    stages {
        stage('Checkout') {
            steps {
                sh "git clone --depth=1 https://github.com/kubeshop/monokle-demo.git ."
            }
        }

        stage('Validate Helm Chart') {
            steps {
                sh "helm template $HELM_CHART | monokle validate --project $MONOKLE_PROJECT --api-token $MONOKLE_TOKEN -"
            }
        }
    }
}